
Summer camp registration season is a sprint. You’ve got a few months to fill your sessions, collect payments, and get every camper’s information organized before the first day. If your registration process is clunky, parents will bail and sign up for the camp down the road instead.
The biggest friction point? Families with multiple kids. A parent wants to register three children for two different camp sessions. That should be simple. But on most WordPress sites, it means creating three separate accounts with three separate email addresses, logging in and out to register each child, and paying three times. Most parents won’t do that — they’ll either give up, call your office to register by phone, or cram all three kids under one account and hope you can sort it out.
This guide shows you how to build a camp registration site with WordPress where one parent account manages multiple camper profiles — each with their own name, their own information, and their own registrations. It’s the same model Netflix uses (one account, multiple profiles), applied to camp registration.
Why camp registration is harder than it should be
Camps have a unique challenge that most WordPress sites don’t deal with: the person paying is not the person participating. Parents are the customers, but campers are the users. And most families have more than one camper.
WordPress treats every user as an independent person with their own email, password, and login. This model falls apart for camps because:
- Young campers don’t have email addresses. You can’t ask a 7-year-old to verify their email and set a password.
- Parents need to manage everything centrally. One parent, one login, full control over all their campers’ registrations and information.
- Each camper needs individual data. Allergies, medical info, emergency contacts, t-shirt sizes, age groups — this data is per-camper, not per-family.
- You need clean roster data. When you print a roster for the arts & crafts session, you need to see “Emma Johnson, age 9” — not “Johnson Family Account.”
Dedicated camp management software like CampMinder or UltraCamp solves this, but it costs thousands per year and locks you into their platform. If you already have a WordPress site for your camp — or want to build one — you can get the same family registration experience with the right plugin setup.
The WordPress stack for camp registration
Here’s what you need and what each piece does.
ProfileSwitch — One parent account, multiple camper profiles
ProfileSwitch is the plugin that makes family accounts work on WordPress. A parent creates one account and adds profiles for each of their campers. Each profile is a real WordPress user with their own name, avatar, and data — but no separate email or password is needed. The parent switches between profiles to manage each camper’s information and registrations. ProfileSwitch handles the email addresses automatically using plus-addressing tied to the parent’s real email, so all communications go to the parent.
Paid Memberships Pro — Registration and payments
Paid Memberships Pro handles the actual registration and payments. You create a membership level for each camp session or program — “Week 2: Arts & Crafts,” “Week 3: Outdoor Adventure,” etc. — with its own price and content. Parents switch to a camper’s profile, check out for the sessions that camper is attending, and each registration is tied to that individual child. PMPro treats each camper profile as an independent member with their own level, payment record, and access. WooCommerce is another option if you prefer selling sessions as products — ProfileSwitch’s WooCommerce integration lets the parent account see and manage orders from all camper profiles in one place.
BuddyPress or BuddyBoss (optional) — Camper profile fields
If you need to collect detailed camper information — allergies, medical conditions, emergency contacts, t-shirt sizes, swimming ability — BuddyPress gives you custom profile fields that attach to each individual camper. ProfileSwitch’s BuddyPress integration pulls these fields into the profile creation form, so parents fill in the details when they add each camper. No separate forms, no data scattered across different systems.
The registration flow: what parents actually experience
Let’s walk through a real scenario. The Garcia family has two kids — Mia (10) and Lucas (7) — and wants to register both for summer camp.
Step 1: Parent creates an account
Mom visits your camp website, clicks “Register,” and creates a standard WordPress account with her name, email, and password. At this point, no registration or payment happens — the parent account is just the hub for managing the family.
Step 2: Parent adds camper profiles
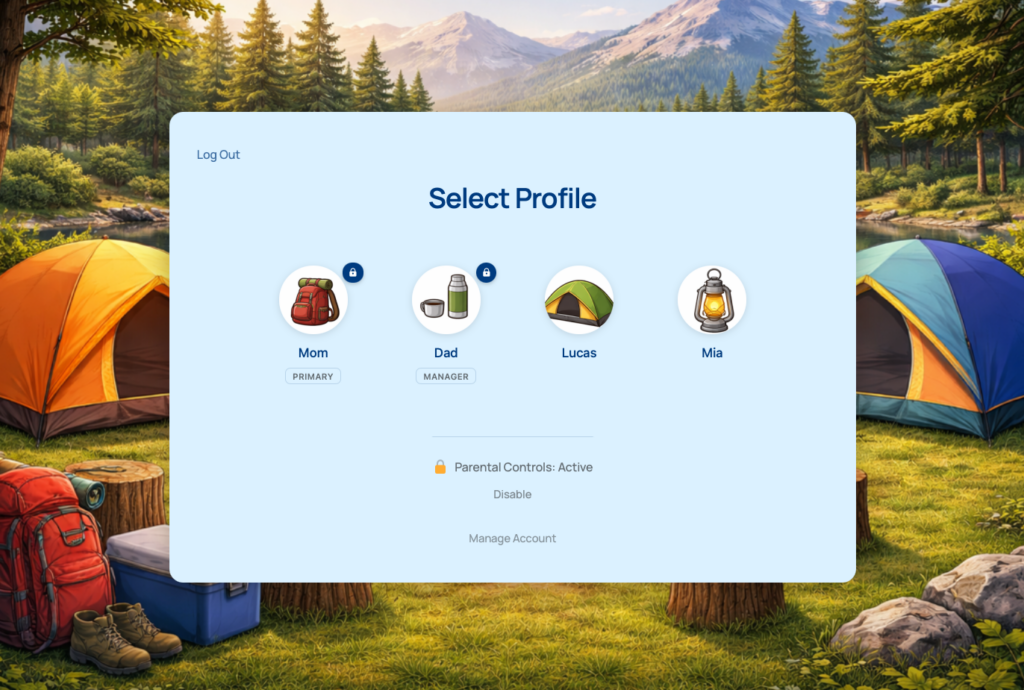
After logging in, the profile switcher appears — a full-page “Switch Profile” screen. Mom sees her own profile and an “Add Profile” button. She taps it and creates a profile for “Mia.” She picks an avatar from the preset options you’ve uploaded (maybe campfire icons, animal mascots, or nature themes). If you’ve set up BuddyPress profile fields, she fills in Mia’s age, allergies (peanuts), emergency contact (Dad’s cell), and t-shirt size (Youth M).
She does the same for Lucas. Two minutes, two camper profiles, zero fake email addresses created.
Step 3: Register each camper for sessions
Mom switches to Mia’s profile and registers her for “Week 2: Arts & Crafts” and “Week 4: Outdoor Adventure.” Then she switches to Lucas’s profile and registers him for “Week 2: Sports Camp” and “Week 3: Science Explorers.” Each registration is tied to the individual camper — Mia’s registrations are on Mia’s profile, Lucas’s are on his.
From her own parent profile, Mom can switch between camper profiles anytime to check registration details, update information, or renew for next session — all without logging out.
Step 4: Both parents can manage everything
Mom creates a profile for Dad with his real email address and password (using ProfileSwitch’s custom credentials feature), then promotes him to profile manager. Now Dad can log in independently on his own device, see both kids’ profiles, check registration details, and update camper information. Both parents have full control.
Collecting camper information the right way
Camps need more information per participant than most websites — medical details, emergency contacts, dietary restrictions, pickup authorization. The key is attaching this data to the individual camper, not to the parent account.
Since each camper profile in ProfileSwitch is a real WordPress user, any plugin that stores data per-user will automatically keep each camper’s information separate. Here are two approaches:
Option A: BuddyPress profile fields
BuddyPress lets you create custom profile field groups with any fields you need — text fields, dropdowns, date pickers, checkboxes. Create a field group called “Camper Information” with fields like:
- Date of birth
- Allergies / medical conditions
- Emergency contact name and phone
- T-shirt size
- Swimming ability (dropdown: non-swimmer, beginner, intermediate, advanced)
- Authorized pickup persons
ProfileSwitch’s BuddyPress integration pulls these fields into the “Add Profile” form. When a parent creates a new camper profile, they see the avatar picker plus all of your custom fields. The data is stored on the camper’s individual user profile, visible to admins from the WordPress dashboard.
Option B: WordPress user meta
If you don’t want to install BuddyPress, you can use any plugin that adds custom fields to WordPress user profiles — Advanced Custom Fields (ACF), Meta Box, or Pods. Since each camper profile is a standard WordPress user, these fields attach to individual campers naturally. The parent switches to a camper’s profile, fills in the fields on the profile edit page, and the data stays with that camper.
Keeping kids safe on the site
Camps deal with kids, and kids end up using parents’ devices. ProfileSwitch has a full parental control system designed for this.
Profile PINs
Parents set a 4-digit PIN or alphanumeric password on their profile. When a PIN is set, a lock icon appears on the profile in the switcher. Anyone trying to switch to the parent’s profile — to access billing, account settings, or payment details — has to enter the PIN first. The parent’s PIN also works as a master override for all camper profiles. PINs are hashed and stored securely, with rate limiting (5 failed attempts = lockout) and a “Forgot PIN” email recovery flow.
Protected pages
You can mark any page on your site as “protected” in ProfileSwitch’s settings. Camper profiles need to enter the parent’s PIN to access these pages. For a camp site, you’d typically protect the checkout page (so kids can’t register for additional sessions without a parent), any shop pages, and any pages with parent-only content like health forms or financial information.
Forced profile selection
When parental controls are active, ProfileSwitch can force users to select a profile immediately after login instead of landing on the homepage as the parent. This prevents kids from accidentally browsing the site under the parent’s identity — they go straight to the “Who’s using this?” screen and pick their own profile.
Real-world example: a multi-session day camp
Let’s put this all together. You run a day camp with eight weekly sessions over the summer. Each session has a theme — sports, art, science, outdoor adventure, etc. Parents can register each child for different sessions. Here’s the full experience.
Your setup:
- WordPress + Paid Memberships Pro (each camp session is a membership level)
- ProfileSwitch (family accounts with parental controls enabled)
- BuddyPress (camper profile fields: age, medical info, emergency contacts)
- Camp-themed preset avatars uploaded in ProfileSwitch (tent, campfire, bear, eagle, etc.)
The Thompson family experience:
- Dad creates an account on your camp website with his email and password.
- He adds profiles for Lily (11) and Noah (8). Lily picks the eagle avatar; Noah picks the bear. Dad fills in each child’s allergies, emergency contacts, and t-shirt sizes through the BuddyPress fields on the profile creation form.
- He creates a profile for Mom with her email and password, then makes her a profile manager.
- He sets a PIN and enables parental controls. The checkout page and any parent-only pages are marked as protected.
- He switches to Lily’s profile and registers her for Week 2 (Art) and Week 5 (Outdoor Adventure) through PMPro checkout.
- He switches to Noah’s profile and registers him for Week 2 (Sports) and Week 6 (Science).
- Back on his own profile, he can see all four orders — two for Lily, two for Noah — in one unified order history.
- When Lily grabs the iPad to look at the camp schedule, she picks her profile from the switcher. She can see camp information and her registrations, but she can’t access the shop, checkout, or Dad’s profile without the PIN.
What you see as the camp admin: Four distinct WordPress users — Dad, Mom, Lily, Noah — all linked together. You can pull a roster for “Week 2: Art” and see “Lily Thompson, age 11, allergic to bee stings, emergency contact: Dad (555-0142).” You can pull a roster for “Week 2: Sports” and see “Noah Thompson, age 8, no allergies, emergency contact: Mom (555-0198).” Clean, individual data for every camper.
Why WordPress instead of dedicated camp software?
Dedicated camp management platforms exist — CampMinder, UltraCamp, CampBrain, Sawyer. They handle registration, payments, health forms, and communication. But they come with trade-offs:
- Cost. Most charge per-camper or per-registration fees that add up fast. A camp with 200 registrations might spend $2,000–5,000/year on software alone.
- Separate systems. Your website is on WordPress, but your registration is on CampMinder. Parents bounce between two different interfaces. Your branding is split.
- Platform lock-in. Your data lives on their servers, in their format. Moving to a different system means starting over.
- Limited customization. You get whatever features the platform offers. Need something specific? You’re stuck waiting for them to build it.
With WordPress, everything lives on your site — your content, your registration, your community. You own the data. You control the experience. And the total cost of WordPress hosting + a few plugins is a fraction of what dedicated camp software charges. For small to mid-size camps that don’t need enterprise-grade features, it’s often the smarter choice.
Getting started before registration opens
If you’re getting ready for summer registration, here’s the setup checklist:
- Install ProfileSwitch and activate your license.
- Create the profile switcher page from the General settings tab.
- Upload camp-themed preset avatars — campfire, tent, animal mascots, nature icons. This makes the profile selection screen feel fun for kids.
- Enable PINs, parental controls, and profile managers on the PINs & Access Control tab.
- Mark sensitive pages as protected — your shop, cart, checkout, and any parent-only content pages.
- Enable custom credentials on the Advanced tab so co-parents can have their own logins.
- Set up your PMPro membership levels — one level per camp session or program. Parents switch to each camper’s profile and register them individually through PMPro checkout.
- If using BuddyPress: Create your camper information fields and select the field source in ProfileSwitch’s Integrations tab.
- Test the full flow. Create a test parent account, add two camper profiles, register each for a session, and verify you can see both registrations from the parent account.
Registration season moves fast. The camps that make it easy for parents to sign up multiple kids in one sitting — without juggling multiple accounts — are the ones that fill up first.
Fill your camp sessions faster
ProfileSwitch adds Netflix-style family accounts to your camp website. One parent login, multiple camper profiles, each with their own data. No fake emails, no password juggling. Works with Paid Memberships Pro, WooCommerce, BuddyPress, and most WordPress plugins.
Leave a Reply