
If your WordPress site sells products, subscriptions, or memberships, there’s a good chance some of your customers are families. And where there are families, there are kids who might be browsing on a shared device.
Most parents aren’t worried about their kids browsing your catalog or reading course materials. What they are worried about is their child stumbling onto the checkout page and placing an order. Or opening the subscription management page and canceling a plan. Or accessing payment settings and seeing saved credit card details.
WordPress doesn’t have a built-in way to handle this. There’s no concept of a “child account” that can browse freely but gets blocked from sensitive pages. You either give someone full access or no access at all.
ProfileSwitch solves this with parental controls built into its shared account system. Parents create profiles for their kids under one login, then PIN-protect sensitive pages so children can’t access them without the parent’s permission. Here’s how to set it up and what your customers will actually experience.
Why WordPress needs parental controls
Think about how families actually use your site. A parent signs up, buys a subscription or enrolls their kids in a program, and then hands the laptop or tablet over so the kids can access their content. Maybe it’s an online course. Maybe it’s a membership community. Maybe it’s a homeschool curriculum store where kids browse what’s available.
The problem is that the parent’s account has access to everything: checkout, saved payment methods, subscription management, account settings. A curious kid is one click away from placing an order, changing a subscription, or worse.
Some site owners try to work around this by telling parents to log out when handing the device over. But that’s a terrible user experience — nobody wants to log in and out every time their kid needs to use the site. Others create separate accounts for kids, but that means managing multiple logins and kids often don’t even have their own email addresses.
What parents actually need is simple: let kids browse freely, but block them from the pages where money changes hands or account settings can be modified. That’s exactly what ProfileSwitch’s parental controls do.
How ProfileSwitch parental controls work
ProfileSwitch lets one WordPress account have multiple profiles. A parent logs in and creates profiles for each of their children — no separate email addresses or passwords required. Each profile is a real WordPress user under the hood, so plugins like WooCommerce, LearnDash, or Paid Memberships Pro treat each one as a distinct person.
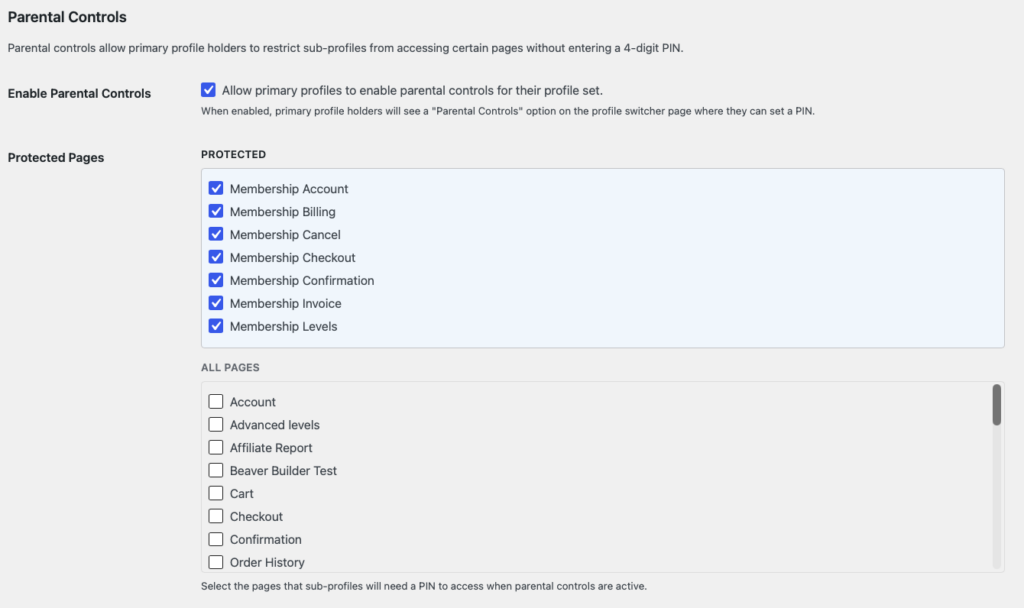
Parental controls add a layer on top of this. When enabled, the parent selects which pages on your site should be restricted. Any page can be protected — checkout, My Account, subscription management, the shop page, a payment form — whatever makes sense for your site.
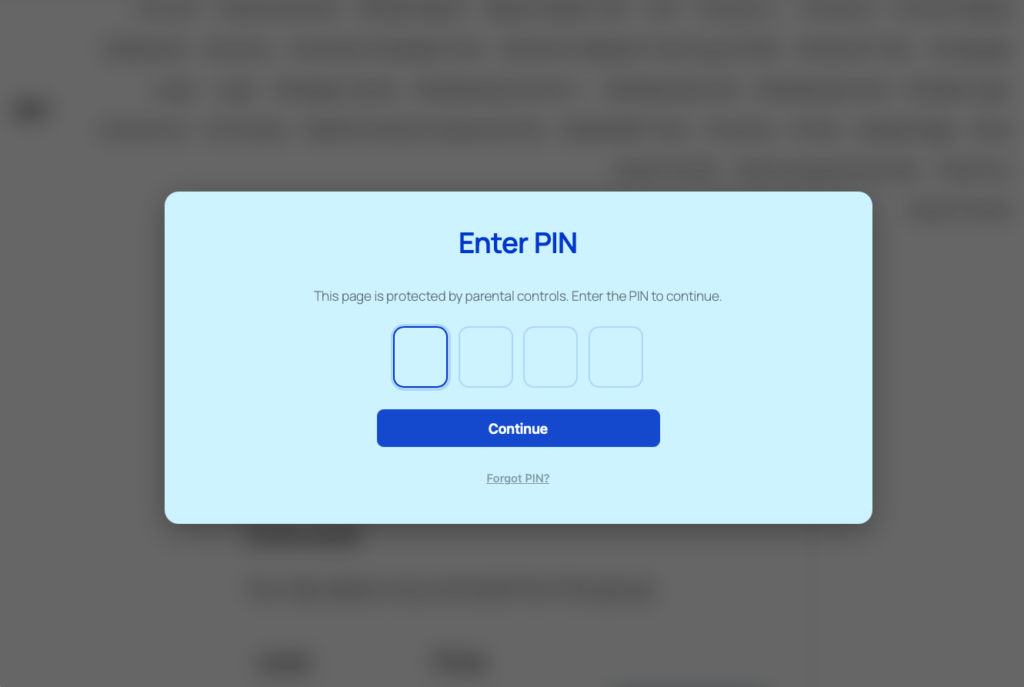
When a child profile tries to visit a protected page, they don’t see it. Instead, they hit a full-screen PIN gate — a clean, branded page that asks for the parent’s PIN before allowing access. No sneaking past it, no workaround. The child either knows the parent’s PIN or they don’t get through.
The parent’s profile and any designated manager profiles bypass the PIN gate entirely. They see every page normally, no interruptions. Only child (sub) profiles are restricted.
Once a child enters the parent’s PIN to access a protected page, the session stays unlocked for one hour. So if a parent enters the PIN to let their child check out, the child won’t be asked again for every protected page during that session. When the session expires, the PIN gate comes back.
What pages should you protect?
This depends on your site, but here are the pages most site owners protect:
Checkout and cart pages
The most common choice. Prevents children from completing purchases, even if they add items to a cart. The parent must enter their PIN before anyone can check out.
My Account and account settings pages
Keeps children away from saved payment methods, billing addresses, and account details. Especially important if your site stores credit card information or allows customers to manage their subscription billing.
Subscription management pages
If you use WooCommerce Subscriptions, Paid Memberships Pro, or any plugin that lets users cancel, upgrade, or downgrade plans, you’ll want that page locked. One accidental cancellation and a parent loses access to your service.
Shop or product catalog pages
Some site owners want to restrict browsing entirely so children can only access their courses, content, or community — not the storefront. Less common, but useful for sites where kids should have a focused, distraction-free experience.
You choose which pages to protect from the ProfileSwitch settings in your WordPress dashboard. Any page on your site can be added to the protected list.
The PIN system: secure but simple
Parental controls are powered by ProfileSwitch’s PIN system. When parents set a PIN on their profile, it serves double duty: it protects their profile from being switched to by their kids, and it becomes the master key for all protected pages.
There are two PIN types to choose from:
- Numeric (4-digit PIN) — Fast to enter, familiar from phone unlock screens. Four separate input boxes with auto-advance, so the experience feels native.
- Alphanumeric (password-style) — A longer, more secure option for parents who want something stronger than four digits. Minimum four characters, no maximum.
Security is taken seriously even though this is a PIN and not a full password. PINs are hashed using WordPress’s native password hashing — the same system that protects login passwords. Failed attempts are rate-limited: after five wrong tries, the account is locked out for one minute to prevent brute force guessing. And if a parent forgets their PIN, there’s a “Forgot PIN” flow that sends a one-time reset link to the primary account’s email address.
Setting up parental controls: step by step
There are two sides to setting up parental controls with ProfileSwitch: what you do as the site owner, and what your customers do as parents. Here’s both.
What you do (site owner setup)
- Install and activate ProfileSwitch from your WordPress dashboard (setup guide)
- Enter your license key on the ProfileSwitch settings page
- Create the profile switcher page (one click from the settings page)
- Enable Profile PINs from the PINs & Parental Controls tab and choose your PIN type (numeric or alphanumeric)
- Enable Parental Controls from the same tab
- Select your protected pages — check the pages you want to restrict for child profiles
That’s the site-wide configuration. You’re telling ProfileSwitch which pages can be protected and making the feature available to your customers.
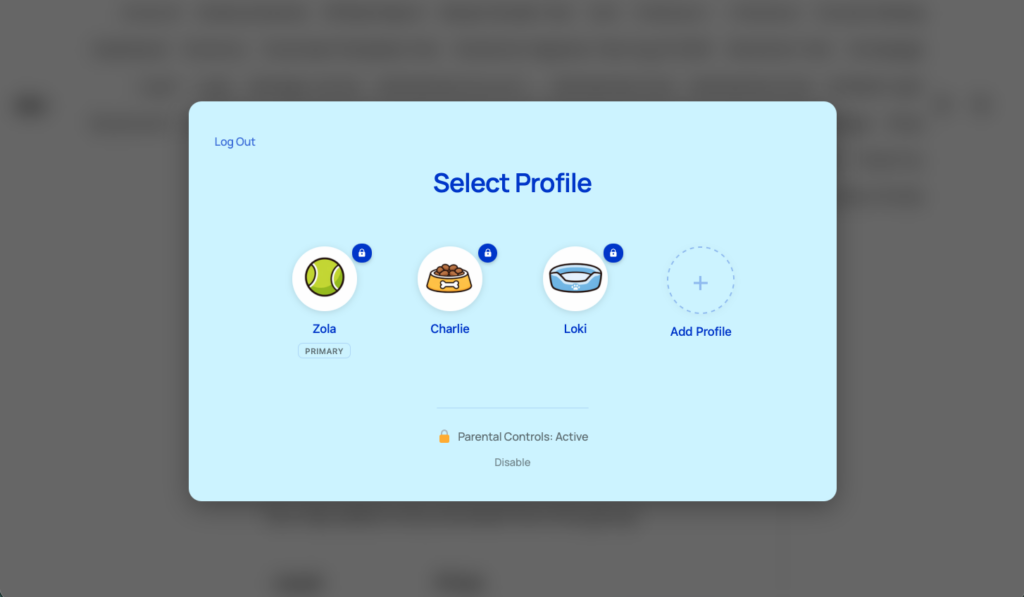
What your customer does (parent setup)
- Log in and go to the profile switcher page
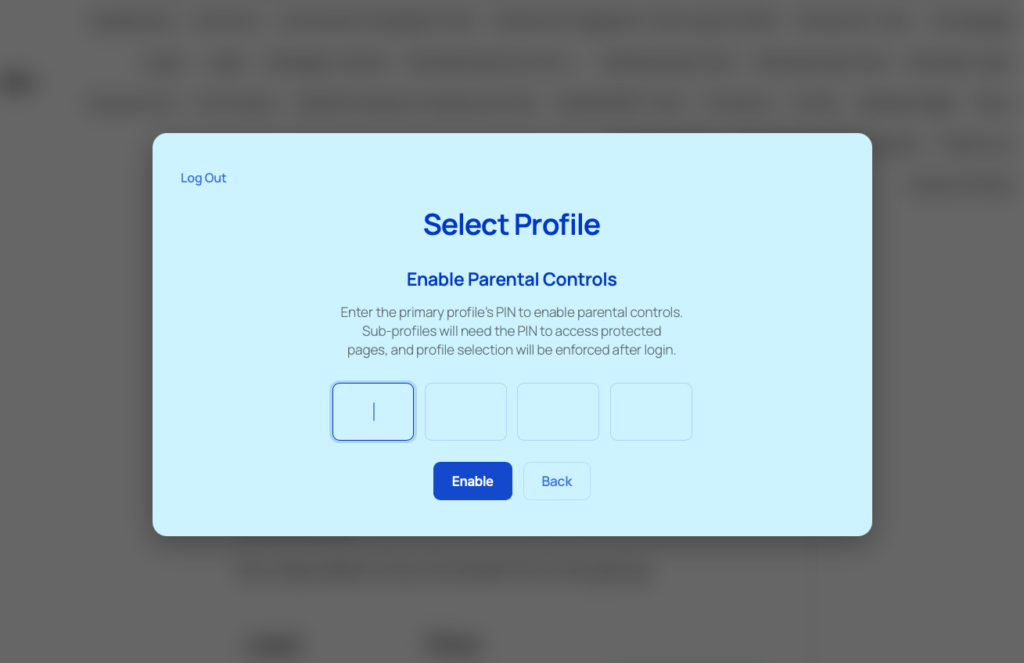
- Set a PIN on their primary profile by clicking Edit Profile
- Enable parental controls — a link appears on the profile switcher once a PIN is set
- Verify their PIN to confirm they want parental controls active
- Create child profiles using the Add Profile button (which now requires the parent’s PIN)
[IMAGE: Screenshot of the profile switcher page showing the “Enable Parental Controls” option]
Once parental controls are active, every protected page on your site is locked behind the parent’s PIN for all child profiles in that account. The parent can disable parental controls at any time from the same profile switcher page.
What the child actually sees
Here’s the experience from the child’s perspective:
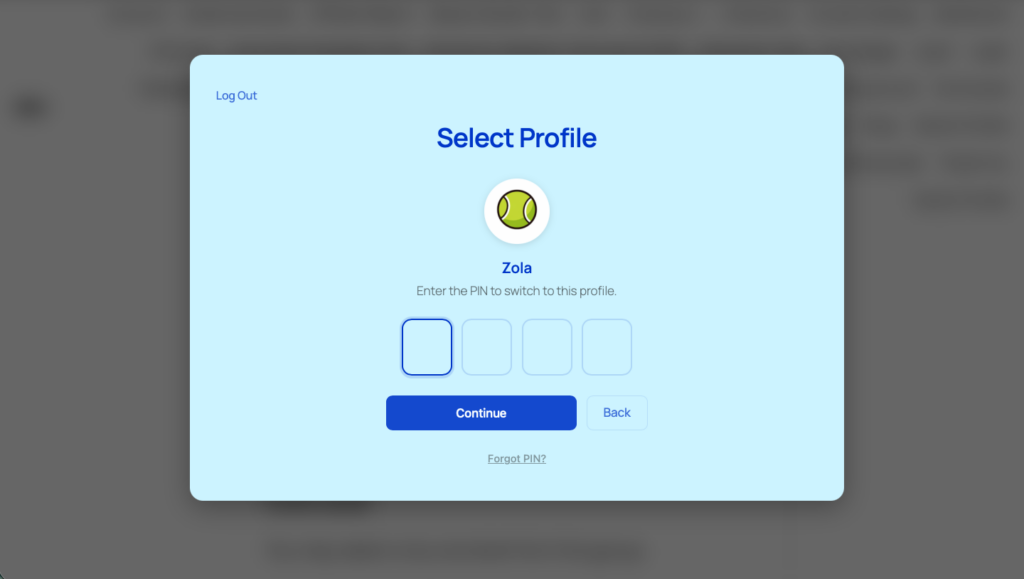
- Parent logs in and selects the child’s profile from the profile picker
- Child browses the site normally — courses, content, community, whatever isn’t protected
- Child clicks a link to a protected page (e.g. checkout)
- Instead of the page, they see a full-screen PIN gate asking for the parent’s PIN
- Without the PIN, they can’t proceed — they’d need to go back to an unprotected page
- If the parent enters the PIN, the protected page loads and stays unlocked for the session
The PIN gate page is a clean, full-screen design that matches your site’s branding. It’s not a jarring error page — it simply asks for the PIN and provides a clear message about why access is restricted. It also includes a “Forgot PIN?” link that sends a reset email to the parent’s address, so they’re never permanently locked out.
Which types of sites benefit most?
Parental controls make sense on any WordPress site where families are part of the customer base. Here are the most common use cases:
Online learning and course platforms
A parent buys access to online courses for their children. Each child gets a profile with their own course progress, but the checkout and subscription management pages are locked. Kids focus on learning, parents control spending.
Homeschool curriculum stores
Parents buy workbooks, digital downloads, or subscriptions for multiple children. Each child gets their own profile to track their materials, but only the parent can make new purchases or manage the subscription. Kids can browse what’s available without accidentally (or intentionally) ordering something.
Membership communities and clubs
Family memberships where each person has their own profile within the community, but the parent maintains control over the billing and membership settings. Think youth sports organizations, scouting groups, or family recreation memberships.
WooCommerce stores with family customers
Any store where parents shop for their family. Protect the checkout and My Account pages so kids can browse the catalog on a shared device without the parent worrying about unauthorized purchases or access to payment details.
What parental controls don’t cover
ProfileSwitch’s parental controls are page-level restrictions, not a full content filtering system. It’s important to set the right expectations:
- It blocks pages, not content within pages. You can protect your checkout page, but you can’t hide a specific paragraph on a blog post. If a page is protected, the entire page is behind the PIN gate.
- It doesn’t filter external links or third-party content. If your site links to an external payment processor or a third-party app, those destinations are outside of ProfileSwitch’s control.
- It’s not a screen time or device management tool. ProfileSwitch doesn’t limit how long a child can browse or what time of day they can access the site. It only controls which pages they can see.
That said, for most WordPress sites, page-level restriction is exactly what’s needed. The sensitive actions — buying something, managing a subscription, viewing payment methods — all happen on specific pages. Block those pages, and you’ve covered the critical risk areas.
More than just parental controls
Parental controls are one feature within ProfileSwitch’s broader shared account system. When you install ProfileSwitch, your family customers also get:
- One login for the whole family. No juggling passwords or email addresses for each child. The parent logs in once and switches between profiles with a single click.
- Separate order history per profile. Each child’s purchases, registrations, and downloads are tracked under their own profile. No more digging through a combined order list.
- Consolidated order management for parents. The parent sees every order across all profiles from their WooCommerce My Account page, with labels showing which child placed each order.
- PIN protection on profiles. Even without parental controls, parents can set PINs on individual profiles so kids can’t switch to each other’s profiles and mess with each other’s stuff.
- Preset avatars for a streaming-service feel. Upload preset avatar images so each profile has its own identity — similar to how Netflix or Disney+ lets family members pick their own icon.
Parental controls for your WordPress site
Let parents create profiles for their kids, block access to checkout and payment pages, and keep everything organized under one account. Set up in 5 minutes with a 14-day money-back guarantee.
Leave a Reply